almateria ♔ 122
Request by inquisitory.
Using PS CS, we'll be turning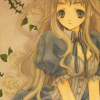
into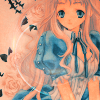
. This tutorial is translatable only to other PS programs.
This tutorial is based off this tutorial. :)
01 Start with your base. Here's my base.
02 Make a new Selective Color adjustment layer, and input these values:
Reds: -100 0 100 45
Yellows: -40 25 100 55
Neutrals: 25 -5 -20 5
03 Make a new layer and fill it with #0A6000. Set it to difference 15%.
04 Make a new Selective Color adjustment layer, and input these values:
Reds: -100 -20 100 -10
Yellows: -80 75 80 65
Neutrals: 25 -10 -25 -10
05 Duplicate your base twice, and set both layers to softlight 100%. Desaturate both layers.
06 Make a new Hue/Saturation/Lightness adjustment layer, and set master saturation to 5.
07 Make a new Selective Color adjustment layer, and input these values:
Yellows: 0 0 -40 0
Neutrals: 40 0 0 -25
08 Paste this texture (by ninesouls) and set it to erased 100%. I erased the parts covering the girl's face.
09 Make a new Brightness/Contrast adjustment layer, and set brightness to 10 and contrast to 5.
I'd love to see what you guys come up with, so please post your results! Hope this tutorial helped :)
Like what you see? Why don't you friend us!