Tutorial: Color isolation (monochrome) and eye color adjustment
Hey everyone!
A few people were interested in seeing this tutorial, so I decided to put it together.
This tutorial was created for Adobe Photoshop 7.0, though I think it can be used across versions of PS and is translatable to other programs. ETA: If you are a PSP user, cho_malfoy explained some changes you should make here. It's fairly easy, and I avoided using Curves for beginners/intermediates who may not have mastered that yet.
You will be going from this to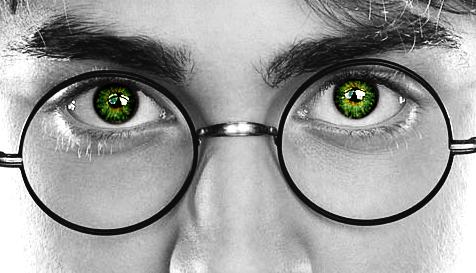
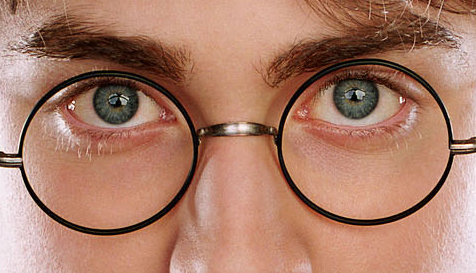
Here is your starting image. If you would like to follow the tutorial exactly, go ahead and copy it into Photoshop/PSP/Gimp/etc. now.

1. Duplicating the base layers and adjusting layer style
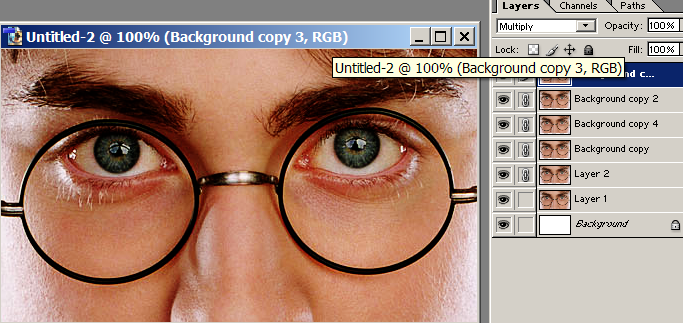
Duplicate your base four times. The top layer should be set to Multiply, the layer beneath that to Soft Light, and the next two layers two Screen. Your layer pallete should look something like this (but without the layer one...something funky went on):
Why did we do this step?
The Multiply (top) layer darkens the image a bit, because I found the original to be too light. The Soft Light layer strengthens the dark colors in the image, making it more striking and creating more natural contrast. The Screen layers lighten up the highlighted parts of the image to compensate for the darkness created by the multiply layer.*
*If this made no sense, please let me know in the comments so I can word it more appropriatley!
2. Add a brightness/contrast layer on top of the rest of the image
Before doing anything, click on your topmost layer. It will make sure the brightness/contrast layer goes on top of everything else.
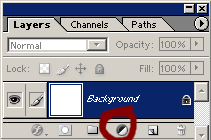
Click on the semi-circle that is circled in red on this image--you should see this on the bottom of your layer pallette. Select "Brightness/Contrast." Adjust both to your preference--I increased my brightness to about 30 and my contrast to about 20, if I remember correctly. However, it IS up to you to decide how you want your image to look, so play with the settings until you're most happy.
Your layers pallete should now like this:
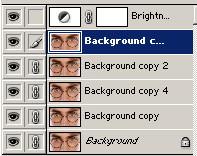
[Don't worry about the links between all of the background layers; it's just my personal preferance to keep images of the same thing linked]
3. Merge all of the layers by going to Layer-->Merge Layers (or CTRL+E for PC users)
My image now looks like this:
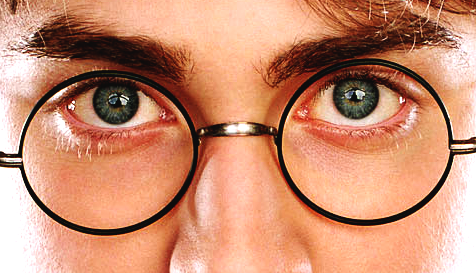
4. Make the image black and white
Make a new layer by going to Layer-->New-->Layer (or CTRL+SHIFT+N for PC users). Floodfill it with black and set the layer setting to color. Your image should now look something like this:
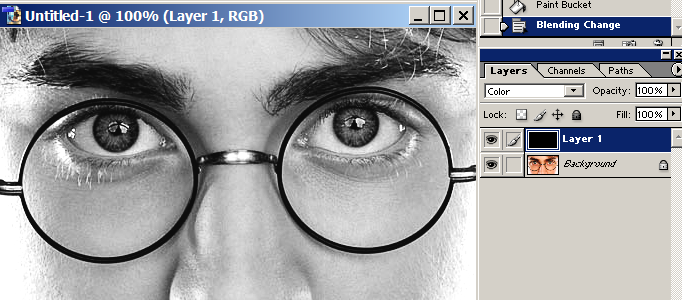
Why did we make a color layer instead of desaturating it?
I always do this out of habit--desaturating your image is permanent, and this way if you need to change something, you can easily. Also, since we want an original color from the original picture to show through the black and white, desaturating the image is not appropriate as we would lose that coloring.
5. Make a vector mask and erase the black and white over the eyes so the color shows through
Selecting the black floodfill layer in your layer pallete, click on the folder with a semi-circle inside it next to the black and white semi-circle that you used earlier. It looks like this:
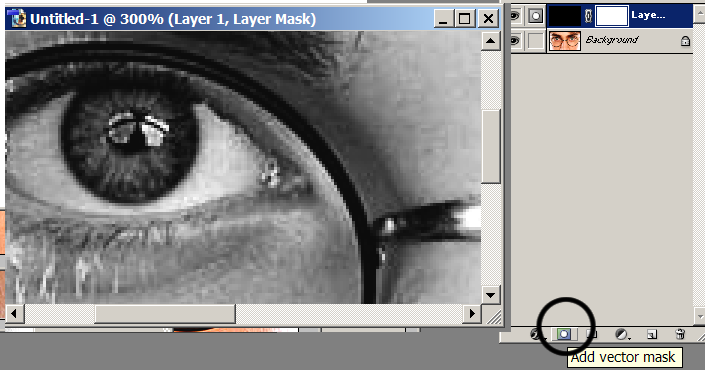
This creates a vector mask. A vector mask allows you to erase parts of your image and un-erase them at a later time if you choose to do so without undoing all of your other work--helpful if you make a mistake!
To use the vector mask, use your PAINTBRUSH tool in black to erase, and the paintbrush tool in white to make any part of the image come back. So, select your paintbrush at a smallish size--probably around six pixels--and paint in black over his eyes. If you make a mistake, don't undo your work! Simply go over the bad part in white.
At this point, my image looks like this:

This is probably the most confusing step if you are newer at Photoshop. If you have any questions, please make sure to ask!
6. Highlight his eyes
Select the bottom layer and use the magic wand tool to highlight his eyes. Hold down shift when you click to select more colors. If you get too much selected at a time (like his skin or eyebrows), lower the tolerance of the tool. If this you find this a little challenging, use the elliptical marquee tool on "Add to Selection" and make circles around both of his irises. If you experience problems with this step, please inform me so I can try and help you troubleshoot! It's a bit difficult to explain in general, so it may be easier on a one-to-one basis.
Here's what my image looks like now:

7. Adjust the color of his eyes
This step is the fun part! Select the bottom layer again (the actual image) in your layer pallete, then go to Image-->Adjustments-->Variations. Making sure that you're adjusting the Midtones and have the scroll bar on the second from the left, begin to slowly adjust the colors. This is another personal preferance thing, but the adjustments that I used were, in order:
Darker
Darker
Yellow
Yellow
Yellow
Cyan
Yellow
Blue
Blue
Yellow
Notice: no green! If you just up the green, your result won't be realistic, so pay attention as you go.
Select ok, then go to Image-->Adjustments-->Brightness/Contrast (NOT the semi-circle we used before!). Adjust the brightness/contrast to your heart's desire. I increased my contrast to around 30 to create a deeper, richer feel to his eye and really highlight the sparkling from the light and lowered the brightness to -2 so his eyes didn't look insane.
My result:

-->
And that's it!
I hope that this was clear and easy to understand. If there is ANY step with which you would like assistance or don't quite understand my phrasing, please let me know in the comments! If you have any suggestions on how to strengthen the tutorial, I'd love to hear that as well!
Remember: the settings you use will almost definitely be different for every picture on which you use this technique. Your brightness/contrast layers and variations will not be constant. Make sure to adapt your settings for the picture that you're using!
I'd love to see anything that you made with this tutorial, so feel free to post them in the comments!
I hope you enjoyed this, again, and happy graphic-ing! Let me know your thoughts :)
If you enjoyed this tutorial and would like future updates, you can join the community here.
A few people were interested in seeing this tutorial, so I decided to put it together.
This tutorial was created for Adobe Photoshop 7.0, though I think it can be used across versions of PS and is translatable to other programs. ETA: If you are a PSP user, cho_malfoy explained some changes you should make here. It's fairly easy, and I avoided using Curves for beginners/intermediates who may not have mastered that yet.
You will be going from this to

Here is your starting image. If you would like to follow the tutorial exactly, go ahead and copy it into Photoshop/PSP/Gimp/etc. now.

1. Duplicating the base layers and adjusting layer style
Duplicate your base four times. The top layer should be set to Multiply, the layer beneath that to Soft Light, and the next two layers two Screen. Your layer pallete should look something like this (but without the layer one...something funky went on):

Why did we do this step?
The Multiply (top) layer darkens the image a bit, because I found the original to be too light. The Soft Light layer strengthens the dark colors in the image, making it more striking and creating more natural contrast. The Screen layers lighten up the highlighted parts of the image to compensate for the darkness created by the multiply layer.*
*If this made no sense, please let me know in the comments so I can word it more appropriatley!
2. Add a brightness/contrast layer on top of the rest of the image
Before doing anything, click on your topmost layer. It will make sure the brightness/contrast layer goes on top of everything else.

Click on the semi-circle that is circled in red on this image--you should see this on the bottom of your layer pallette. Select "Brightness/Contrast." Adjust both to your preference--I increased my brightness to about 30 and my contrast to about 20, if I remember correctly. However, it IS up to you to decide how you want your image to look, so play with the settings until you're most happy.
Your layers pallete should now like this:

[Don't worry about the links between all of the background layers; it's just my personal preferance to keep images of the same thing linked]
3. Merge all of the layers by going to Layer-->Merge Layers (or CTRL+E for PC users)
My image now looks like this:

4. Make the image black and white
Make a new layer by going to Layer-->New-->Layer (or CTRL+SHIFT+N for PC users). Floodfill it with black and set the layer setting to color. Your image should now look something like this:

Why did we make a color layer instead of desaturating it?
I always do this out of habit--desaturating your image is permanent, and this way if you need to change something, you can easily. Also, since we want an original color from the original picture to show through the black and white, desaturating the image is not appropriate as we would lose that coloring.
5. Make a vector mask and erase the black and white over the eyes so the color shows through
Selecting the black floodfill layer in your layer pallete, click on the folder with a semi-circle inside it next to the black and white semi-circle that you used earlier. It looks like this:

This creates a vector mask. A vector mask allows you to erase parts of your image and un-erase them at a later time if you choose to do so without undoing all of your other work--helpful if you make a mistake!
To use the vector mask, use your PAINTBRUSH tool in black to erase, and the paintbrush tool in white to make any part of the image come back. So, select your paintbrush at a smallish size--probably around six pixels--and paint in black over his eyes. If you make a mistake, don't undo your work! Simply go over the bad part in white.
At this point, my image looks like this:

This is probably the most confusing step if you are newer at Photoshop. If you have any questions, please make sure to ask!
6. Highlight his eyes
Select the bottom layer and use the magic wand tool to highlight his eyes. Hold down shift when you click to select more colors. If you get too much selected at a time (like his skin or eyebrows), lower the tolerance of the tool. If this you find this a little challenging, use the elliptical marquee tool on "Add to Selection" and make circles around both of his irises. If you experience problems with this step, please inform me so I can try and help you troubleshoot! It's a bit difficult to explain in general, so it may be easier on a one-to-one basis.
Here's what my image looks like now:

7. Adjust the color of his eyes
This step is the fun part! Select the bottom layer again (the actual image) in your layer pallete, then go to Image-->Adjustments-->Variations. Making sure that you're adjusting the Midtones and have the scroll bar on the second from the left, begin to slowly adjust the colors. This is another personal preferance thing, but the adjustments that I used were, in order:
Darker
Darker
Yellow
Yellow
Yellow
Cyan
Yellow
Blue
Blue
Yellow
Notice: no green! If you just up the green, your result won't be realistic, so pay attention as you go.
Select ok, then go to Image-->Adjustments-->Brightness/Contrast (NOT the semi-circle we used before!). Adjust the brightness/contrast to your heart's desire. I increased my contrast to around 30 to create a deeper, richer feel to his eye and really highlight the sparkling from the light and lowered the brightness to -2 so his eyes didn't look insane.
My result:

-->

And that's it!
I hope that this was clear and easy to understand. If there is ANY step with which you would like assistance or don't quite understand my phrasing, please let me know in the comments! If you have any suggestions on how to strengthen the tutorial, I'd love to hear that as well!
Remember: the settings you use will almost definitely be different for every picture on which you use this technique. Your brightness/contrast layers and variations will not be constant. Make sure to adapt your settings for the picture that you're using!
I'd love to see anything that you made with this tutorial, so feel free to post them in the comments!
I hope you enjoyed this, again, and happy graphic-ing! Let me know your thoughts :)
If you enjoyed this tutorial and would like future updates, you can join the community here.