U-Bahn fahren in Japan // going by subway in Japan
The English translation can be found at the end of each section in font color teal.
Dies ist eine Anleitung zum U-Bahn fahren in Japan anhand meiner Erfahrungen in Tokyo, Kyoto und Osaka. In anderen Städten ist es ähnlich.
Ich habe bereits das Bus fahren in Kyoto beschrieben und weitere Posts zu Japan verfasst.
This is an explanation on how to use the subway in Japan, based on my experiences in Tokyo, Kyoto and Osaka. It is similar for other cities.
I already wrote about going by bus in Kyoto and wrote some more posts about Japan.
0. Overview
- General
- Buying a ticket
- Passing through the ticket gate
- On the platform
- Entering the train
- Inside the train
- Changing trains
- Leaving the ticket area upon arrival
- Having bought a too cheap ticket /
ticket price adjustments - Reading the electronic ticket
- Allgemeines
- Ein Ticket kaufen
- Durch die Schranke
- Auf dem Bahnsteig
- Das Einsteigen
- Im Zug
- Umsteigen
- Den Ticketbereich verlassen am Zielbahnhof
- Falsches Ticket / nachzahlen
- Das elektronische Ticket auslesen
1. Allgemeines
Die Eingänge zu U-Bahn-Stationen sind auf der Straße durch ein Zeichen gekennzeichnet.
Einige der U-Bahn-Zeichen kann man in der englischen Wikipedia sehen: Tokyo, Kyoto und Osaka.
Für die U-Bahn in Tokyo gibt es auch eine Smartphone App.
In Japan kauft man das Ticket vor der Fahrt. Man braucht das Ticket, um auf den Bahnsteig zu kommen.
Es gibt (für Touristen) nur Einzelfahrkarten; keine Wochenkarten, keine Monatskarten und keine Jahreskarten. Es gibt Rabatt für Kinder.
Neben Fahrkarten auf Papier gibt es elektronische Tickets. D.h. man hat eine Plastikkarte, die man mit Geld auflädt und mit der man den Ticketpreis bezahlt. Der Fahrpreis für Papier-Ticket und elektronisches Ticket ist gleich.
Es gibt verschiedene Plastikkarten, die in verschiedenen Regionen gültig sind.
Ich kenne Suica, Pasmo und ICOCA.
Ich finde das elektronische Ticket praktischer, weil man einfach losfahren kann, ohne erst den Ticketpreis nachschauen zu müssen.
Bild 1: Meine Suica Karte
Image 1: My Suica card
1. General
Entrances to subway stations are marked on the streets with a sign.
You can see some of these signs in wikipedia: Tokyo, Kyoto and Osaka.
There is even a smartphone app for the subway in Tokyo.
In Japan, you buy the ticket before the ride. The ticket is required to get to the platform.
At least for tourists, there are only single trip tickets; no weekly tickets, monthly tickets or yearly tickets.
The ticket prices are cheaper for children.
Aside from paper tickets, there are electronic tickets. The electronic ticket is a plastic card that can be charged with money and used for paying the ticket price. The ticket prices for paper ticket and electronic ticket are the same.
There are several systems of electronic tickets for different regions.
I have heard of Suica, Pasmo and ICOCA cards.
You can see my Suica card in image 1, in the German section above.
I prefer the electronic ticket because I can start my journey faster without having to look up the ticket price first.
2. Ein Ticket kaufen
In jedem U-Bahnhof gibt es eine Karte vom Streckennetz. Dort kann man die Verbindungen und die Preise ablesen. Ich habe nur ein schlechtes Foto von der Karte in Kyoto. Die Karten sind aber auch online verfügbar: Tokyo (pdfs in verschiedenen Sprachen verfügbar), Kyoto, Osaka (pdf).
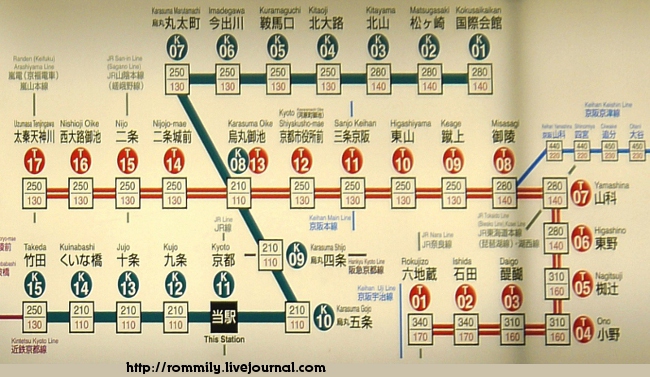
Bild 2: Karte der U-Bahn-Linien in Kyoto
Image 2: Map of Kyoto subway lines
Auf der abgebildeten Karte ist aktuelle Standort in schwarz markiert (unten links). Alle Bahnhöfe sind in Japanisch und Englisch beschriftet. In kleineren Städten oder "weiter draußen" ist die Beschriftung auf der Karte oft nur auf Japanisch. In dem Fall am besten die japanische Schreibweise des Zielbahnhofs vorher raussuchen und mitbringen!
Die Preise für das Ticket stehen in dem Kasten. In manchen Städten ist es auch ein Kreis. Die untere Zahl ist der Preis für Kinder. Den Ticketpreis jetzt merken.
Beispiel: Ein Ticket vom Kyoto Hauptbahnhof zur Haltestelle Sanjo Keihan kostet 250 ¥ für einen Erwachsenen und 130 ¥ für ein Kind.
In vielen Städten sind die Stationen einer U-Bahn-Linie mit einer Farbe und einem Buchstaben markiert und die Stationen haben Nummern. Eine Haltestelle, die auf mehreren Linien liegt, hat mehrere Bezeichnungen. Es ist sinnvoll, sich die Route anhand der Nummern und Farben zu merken.
Beispiel: Ich fahr jetzt mit der blauen Linie von K11 nach K08, steige dann um in die rote Linie und fahre von T13 bis T11.
Mit einer Plastikkarte als elektronisches Ticket kannst du jetzt schon zum Bahnsteig gehen.
An den Ticketautomaten kann man die Plastikkarte bei Bedarf vor der Reise aufladen. Ich glaube der kleinste Betrag waren 1.000 ¥ (ca. 10 €). Ich glaube dort kann man die Plastikkarte auch kaufen.
Papier-Tickets bekommt man am Ticket-Automaten. Die stehen meistens in der Nähe von der Karte und immer in dem Bereich vor der Schranke, den man ohne Ticket betreten kann.
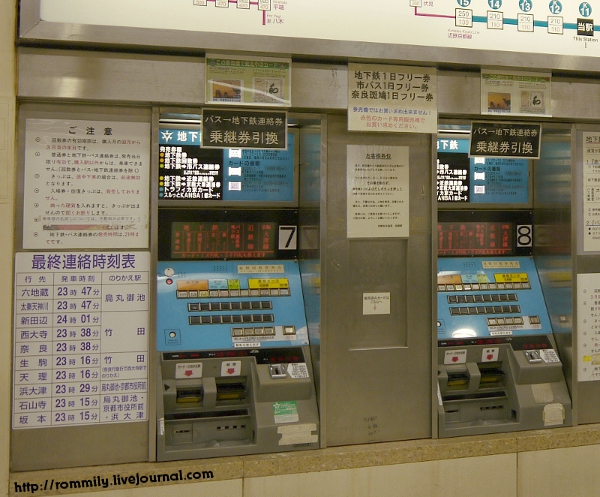
Bild 3: Ticketautomaten in Kyoto
Image 3: Ticket machines in Kyoto
Am Automaten gibt es Schaltflächen für alle Ticketpreise, also z.B. für 210, 250, 280, 310 und 340 ¥.
Wenn gewünscht, kann man die Sprache des Ticket-Automaten auf Englisch umschalten.
Zuerst die Schaltfläche für den Betrag klicken. Dann Geld einwerfen. Der Automat nimmt Münzen und Scheine. Der Automat gibt das Restgeld zurück und gibt das Papierticket aus. Beides entnehmen.
Das Papier-Ticket ist ziemlich klein, kleiner als eine EC Karte. Das Papier-Ticket gut aufbewahren, es wird später noch gebraucht!
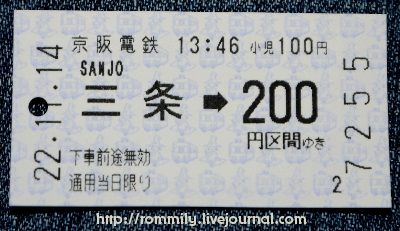
Bild 4: U-Bahn-Ticket auf Papier
Image 4: Subway ticket on paper
2. Buying a ticket
Each subway station has at least one map of the subway lines. The map shows the connections and the prices. I have only a bad picture of the map in Kyoto, see image 2. But the maps are available online: Tokyo (pdfs in several languages available), Kyoto, Osaka (pdf).
On this map, your current location on the map is marked in black (on the bottom left side). All station names are written in Japanese and English. In smaller cities and in the outskirt areas, the station names might be written in Japanese only. In this case it is recommended to find out the Japanese name of the destination before the journey and bring it along.
The ticket prices are written inside the boxes. On other maps, it might be circles. The lower number is for children's tickets. Please memorize the ticket price now.
Example: A ticket from Kyoto main station to Sanjo Keihan costs 250 ¥ for an adult and 130 ¥ for a child.
In many cities, the subway lines have colors and the stations are labeled with a letter and a number. A station located on several lines will have multiple labels. It is helpful to make use of the colors and labels when memorizing the upcoming route.
Example: I will use the blue line now and travel from K11 to K08. Then I will change to the red line and go from T13 to T11.
When you have an electronic ticket (= plastic card), you could go to the platform now.
You could use the ticket machines to load more money onto the plastic card. I think the smallest amount of money was 1000 ¥ (approx. 10 € // 10 $). I think there you can also buy the plastic card.
You buy a paper ticket from the ticket machine. The ticket machines are located close to the map and in the area that is accessable without ticket. You can see ticket machines in image 3.
The ticket machine has buttons for all possible ticket prices, e.g. 210, 250, 280, 310 and 340 ¥.
If you want, you could change the language to English.
First, click on the button for the ticket price. Throw in the money. The ticket machine accepts coins and notes. The ticket machine drops the over-paid money and the paper ticket. Take both with you.
The paper ticket is very small, smaller than a credit card. You can see one in image 4. Keep the paper ticket in a safe plase, you will need it later.
3. Durch die Schranke
Der Zugang zu den Gleisen ist von Schranken versperrt und man kommt nur mit einem Ticket durch. Es ist auch immer Bahnpersonal bei den Schranken postiert, damit niemand drüber klettert. :)
Zwischen den Schranken sind die Ticket-Kontroll-Automaten.
a. Papier-Ticket
Vorne am Ticket-Kontroll-Automaten ist ein Schlitz, dort das Papier-Ticket reinschieben mit der schmalen Seite nach vorne. Abgesehen davon ist es egal, wie man das Ticket reinschiebt (oben/unten bzw. vorne/hinten).
Wenn die Schranke aufgeht, kann man durchgehen und aus dem Automat kommt das Ticket am hinteren Ende raus. Das Papier-Ticket mitnehmen und gut verstauen, es wird später noch benötigt.
b. Elektronisches Ticket
Das Lesegerät für das elektronische Ticket ist im vorderen Bereich vom Ticket-Kontroll-Automaten und gekennzeichnet.
Es reicht, den Geldbeutel mit der Fahrkarte drin auf oder leicht über das Lesefeld zu halten. Wenn die Schranke aufgegangen ist, einfach durchgehen. Den Geldbeutel bzw. die Karte kann man dann wieder verstauen.
3. Passing through the ticket gate
Access to the platforms is restricted by gates. You need a ticket to pass the gates. Train personnel is present in the gate area to prevent people from jumping over the gates. :)
Ticket-control-machines are installed between the gates.
a. Paper ticket
There is a slot on the front side of the ticket-control-machine. Enter your paper ticket with the narrow side first. Aside from "narrow side first", it does not matter how you enter your ticket (sunny side up vs upside down / front side vs back side first).
The gate opens, you pass through the gate and the paper ticket is given back to you on the rear end of the ticket-control-machine. Take the paper ticket with you.
b. Electronic ticket
The reader for the electronic ticket is located on the front side of the ticket-control-machine and marked.
It is sufficient to hold your purse over the reader or put the purse onto the reader. The gate will open and you can pass through. You could put away your purse now.
4. Auf dem Bahnsteig
Der Weg zum richtigen Gleis ist beschildert. Die Schilder greifen die Farben der U-Bahn-Linien auf.
Am Bahnsteig gibt es für jedes Gleis Anzeigen zu den nächsten Fahrten.
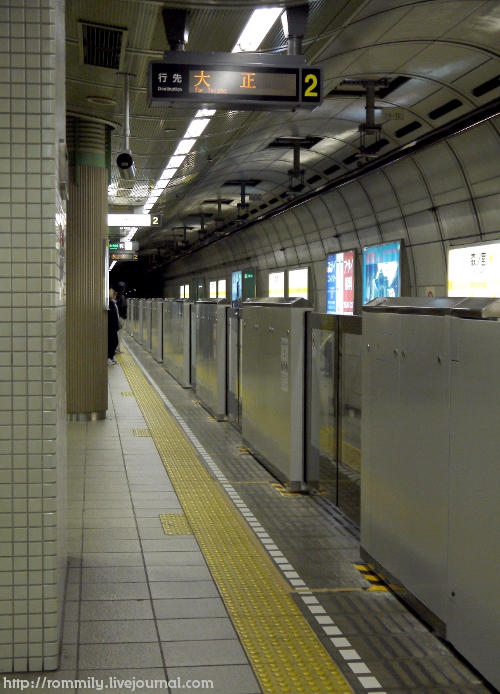
Bild 5: Auf dem Bahnsteig
Image 5: On the platform
Dieses Bild zeigt eine private U-Bahn-Linie, bei der Schranken verhindern sollen, dass Passagiere auf die Gleise fallen.
In Japan stellt man sich in einer Reihe an. Auf dem Boden sind Markierungen, wo die Türen sein werden und manchmal auch, wo die Schlange verlaufen soll. In Bild 5 sind die Markierungen zum Anstellen gelbe Rechtecke auf dem Boden.
Ich mag diese Art des Anstehens sehr, denn sie ist gerecht und ich kann meine Position im Zug selber bestimmen, z.B. indem ich mich in die leere Schlange für den nächsten Zug stelle statt ans Ende der aktuellen Schlange.
Das Gerücht von den Rein-Quetschern halte ich für eine Urban Legend. Ich war mehrmals in Kyoto mit der U-Bahn unterwegs und auch zur Rush Hour in Tokyo mit der Yamanote Line und habe das noch nie gesehen.
Angeblich gibt es dieses Personal nur noch auf einer privaten Linie zur Rush Hour, aber ich bin nicht sicher ob es eine U-Bahn-Linie ist.
4. On the platform
Signs show the way to the platform, using the color of each line from the map.
There is a monitor for each platform, showing the next departures. You can see an example in image 5. Please note that the picture shows a private subway line with special gates to prevent passangers from falling onto the tracks.
In Japan, you queue up in lines for entering the trains. There are marks on the ground, telling you where the trains' doors will be located and sometimes even showing the intended course of the queue. In image 5, the starting points for the queues are marked on the ground with yellow rectangles.
I really like this system of queuing up because it is fair and allows me to influence my position in the train, e.g. by queuing up in a front position for the next train instead of lining of for the current train.
In my opinion, the rumors about the staff squeezing people into already full trains is an urban legend. I took the subway in Kyoto several times and even went with the Yamanote Line in Tokyo during the rush hour and have never seen this.
I have heard that these personnel is only present on a private train line during the rush hours.
5. Das Einsteigen
Wenn der Zug einfährt, halten die Türen ziemlich genau da, wo die Fahrgäste anstehen. Das Aus- und Einsteigen findet gleichzeitig statt statt nacheinander: in der Mitte der Tür steigen Fahrgäste aus und rechts und links davon steigen Fahrgäste zu. Ich hab das mal grob skizziert:

Bild 6: Skizze zum Ein- und Aussteigen
Image 6: Sketch about leaving and entering
Am besten möglichst weit durchgehen, damit die anderen auch einsteigen können. Nicht einfach an der erst besten Haltestange stehen bleiben :)
5. Entering the train
When the train arrives, its doors will stop in alignment with the queues. Getting on and off the train happens in parallel: passengers will leave the train in the middle of the door while passengers will enter the train on the right and left sides of the door. Image 6 shows a sketch of this process.
Please go inside as far as you can go to ensure that all other passengers can enter as well. Please do not cling to the first retaining strap that you see. :)
6. Im Zug
Einige Sitze sind reserviert für ältere, gehbehinderte und schwangere Fahrgäste. Diese Sitze sind speziell gekennzeichnet und befinden sich am Anfang und am Ende von jedem Waggon.
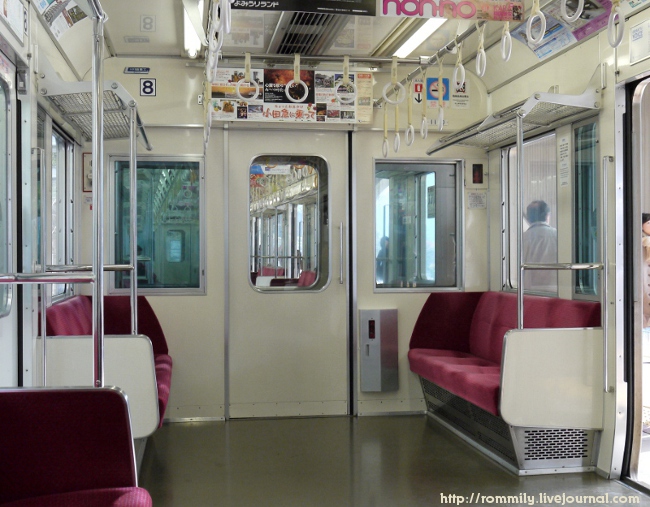
Bild 7: Die Sitze in der U-Bahn
Image 7: Seats inside the subway
Wenn man keinen Sitzplatz hat, kann man sich im Stehen an den Stangen und Halteschlaufen festhalten.
Viele Japaner legen auch ihre Tasche auf die Ablage, sogar dann, wenn sich die Person im Laufe der Zeit im Gedränge von ihrer Tasche entfernt... :)
Im Zug soll man sich ruhig und gesittet verhalten, um die anderen Fahrgäste nicht zu stören. Das heißt: nicht telefonieren, nicht laut reden, keine laute Musik, nicht schminken, nicht die Fingernägel lackieren etc.
Die meisten Japaner benutzen ihr Smartphone oder machen ein Nickerchen. :)
Im Zug ist ein guter Zeitpunkt, um das Papier-Ticket zu fotografieren, denn man darf es nicht behalten.
Die Haltestellen werden auf Japanisch angesagt und in großen Städten auch auf Englisch. Es wird auch immer die Nummer mit angesagt. Ich find es lustig, wie die beiden Ansager die Haltestelle oft total unterschiedlich aussprechen. :)
Im Zug gibt es drei "Fahrspuren" in den Gängen, siehe auch Bild 6: Die mittlere bleibt steht, die beiden anderen bewegen sich zu den jeweils nächsten Türen. Kurz vor der Einfahrt in eine Haltestelle muss man daher nur in die gewünsche Fahrspur wechseln. :)
Und nicht vergessen, nach dem Aussteigen noch ein paar Schritte zu gehen, damit man nicht den anderen Fahrgästen im Weg steht.
6. Inside the train
Some seats are reserved for elderly, handicaped and pregnant passengers. These seats are marked with a sign and located in the front and at the end of each car.
You can see the inside of a car in image 7.
If you cannot sit, you can hold on to the bars and the retaining straps.
Many Japanese passengers put their bag onto the rack, even though they are pushed away from their bag by the crowd... :)
You should behave in the train in a way that you do not disturb the other passengers: no phone calls, no loud talking, no loud musik, do not apply your makeup, do not polish your nails and so on.
Most Japanese passangers use their smartphone or take a nap. :)
Now is a good point in time to take a picture of your paper ticket because you will not be allowed to keep it.
The next station is announced in Japanese and in major cities in English, too. The number of the station is announced as well.
I find it very funny that the pronounciation often differs greatly between the Japanese and the English announcer. :)
Inside the car in the aisle, there are three lanes as shown in image 6: people an the middle lane stay in the car, while the people on the two other lanes move to the closest door. So when the subway approaches the next station, you only need to step onto the desired lane. :)
And when you exit the train, do not stop walking immediately after leaving the train to avoid standing in the way.
7. Umsteigen
Der Weg zur anderen Linie ist ausgeschildert und es wird die Farbe der Linie auf den Schildern benutzt.
Beim Umsteigen muss man wieder durch die Schranke, d.h. das Ticket wieder vorzeigen.
7. Changing trains
The way to the other subway line is marked with signs in the color of the line.
You will pass through another ticket gate, that means you have to show your ticket again.
8. Den Ticketbereich verlassen am Zielbahnhof
An der Zielhaltestelle geht man wieder durch eine Schranke. Man muss wie beim Betreten das Papier-Ticket in den Ticket-Kontroll-Automat reinstecken bzw. das elektronische Ticket über das Lesegerät halten.
Dieses Mal behält der Automat das Papierticket. Das war's!
Die Ausgänge nach draußen sind durchnummeriert und fast alle Geschäfte geben die Nummer des Ausgangs auf ihrer Webseite an unter dem Menüpunkt "access", oft zusammen mit einer Skizze mit Fußweg. Das finde ich sehr toll!
8. Leaving the ticket area upon arrival
At the destination station, you have to go through another ticket gate. As in the beginning, you have to insert your paper ticket or hold the electronic ticket over the reader.
This time, the ticket-control-machine will keep your paper ticket. That's it!
The exits are numbered and most shops state the number of the exit on their website on the sub-page "access" and often a drawing for the walkway is included as well. I like that very much!
9. Falsches Ticket / nachzahlen
Wenn du ein falsches Ticket gekauft haben sollte: kein Problem! Das ist kein Grund zur Panik.
Wenn man ein zu teures Ticket gekauft hat, hat man Pech. Man bekommt das zuviel bezahlte Geld nicht zurück. Der Ticket-Kontroll-Automat am Ausgang wird das Ticket behalten.
Wenn man ein zu billiges Ticket gekauft hat, lässt einen der Ticket-Kontroll-Automat am Ausgang nicht durchgehen. Das Papier-Ticket bekommt man zurück. In der Nähe des Ausgangs ist irgendwo ein Automat zum Nachzahlen, oft nur ein einziger. Er ist beschriftet mit "fare adjustment".
Dort das Ticket reinstecken. Der Automat zeigt dann den Fehlbetrag an. Den muss man bezahlen. Dann bekommt man ein neues Ticket, das man in den Ticket-Kontroll-Automat stecken kann.
Beim elektronischen Ticket kann man nicht zu viel oder zu wenig bezahlen, denn beim Auflegen der Plastikkarte auf das Lesegerät wird der passende Betrag abgebucht.
Falls beim Auflegen der Plastikkarte auf das Lesegerät zu wenig Geld für die Fahrt auf der Plastikkarte sein sollte, kann man Geld aufladen beim Nachzahl-Automaten beim Ausgang.
9. Having bought a too cheap ticket / ticket price adjustments
In case you bought a wrong ticket: don't worry!
If you bought a too expensive ticket, that is sad for you because you will not get back the over-paid money. The ticket machine at the exit will keep your ticket.
If you bought a too cheap ticket, the ticket-control-machine at the exit will not let you go through the gate. The machine will give you back the ticket. Close to thismachine, there is another machine labelled "fare adjustment". Most of the time, there is only one fare adjustment machine.
Insert the paper ticket into the fare adjustment machine. The machine will show you the open amount of money. Pay the remaining fare. The machine will give you a new ticket, that you can use with the ticket-control-machine at the exit.
When using the electronic ticket, you cannot pay too much or too little money, because when putting the plastic card onto the reader it will always charge the exact amount of money.
In case that the plastic card does not hold enough money when putting it on the card reader, it is possible to charge more money onto the card using the fare-adjustment-machine.
10. Das elektronische Ticket auslesen
Am Ticket-Kauf-Automaten kann man einen Papier-Beleg mit den letzten Fahrten mit der Plastikkarte ausdrucken.
Man kann die Plastikkarte mit einer App auf dem Smartphone auslesen. Das Smartphone muss dazu aber NFC-fähig sein. Ich benutze die App "Suica Reader". Sie zeigt für die letzten 10 Fahrten das Guthaben auf der Karte (bei "Bal."), Datum und Uhrzeit der Fahrt und den Fahrpreis. Man kann die Fahrten auch als .csv exportieren. Zum Auslesen die App starten und das Smartphone an die Suica halten.
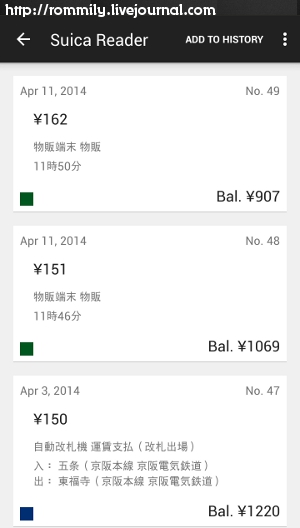
Bild 8: Ein Screenshot von der Suica Reader App
Image 8: A screenshot of the Suica Reader mobile app
Die App zeigt für jede Fahrt u.a. die Anzahl der schon gemachten Fahrten, das Guthaben auf der Karte (bei "Bal."), Datum und Uhrzeit der Fahrt und den Fahrpreis. Man kann die Fahrten auch als .csv exportieren. For reading the data from the card, start the app and hold the Suica close to your smartphone.
10. Reading the electronic ticket
The ticket-purchase-machine can print a paper receipt with the last rides done with the plastic card.
It is possible to read from the plastic card with a smartphone app. But your smartphone needs to be capable of NFC. I am using the Suica Reader App. It shows the last ten rides for the Suica card (see image 8), the balance, date and time of the rides and the fares. It is possible to export the rides as .csv files. For reading the plastic card, you only need to hold the plastic card close to your smartphone while the app is opened.