Making Good Cartoon Icons- Tutorial 5// Music Makes You Lose Control
From 
to
or
in four (count 'em, FOUR) steps!
Difficulty: Uhm, I'm running out of clever ways to say it's easy.
Transferability: So-so. If you can find the equivalent of Automatic Colour Balance in your program, then you're good.
STEP ONE
As usual, base image (This time, it's Tabitha, aka Boom-Boom, of X-Men: Evolution):

+ SOFTEN AND RESIZE + COLOURS > ADJUST > HUE/SATURATION/LIGHTNESS (+10)=

STEP TWO
For step two, I followed this tutorial, also by me. Alright, so far I have this:

STEP THREE
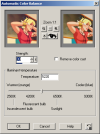
Now for something completely different. Go to Effects > Enhance Photo > Automatic Colour Balance. This is a really neat feature. For this image, I used these settings:

(That's just a thumbnail. Click for full size.)
After that, I sharpened it using Unsharp Mask, which is the best tool evar.
Now we have this:

Good job! Now, the next step is optional...
STEP FOUR
...but I like it. Yet again, I upped the saturation +10.

Done! Told ya it was easy!

to

or

in four (count 'em, FOUR) steps!
Difficulty: Uhm, I'm running out of clever ways to say it's easy.
Transferability: So-so. If you can find the equivalent of Automatic Colour Balance in your program, then you're good.
STEP ONE
As usual, base image (This time, it's Tabitha, aka Boom-Boom, of X-Men: Evolution):

+ SOFTEN AND RESIZE + COLOURS > ADJUST > HUE/SATURATION/LIGHTNESS (+10)=

STEP TWO
For step two, I followed this tutorial, also by me. Alright, so far I have this:

STEP THREE
Now for something completely different. Go to Effects > Enhance Photo > Automatic Colour Balance. This is a really neat feature. For this image, I used these settings:

(That's just a thumbnail. Click for full size.)
After that, I sharpened it using Unsharp Mask, which is the best tool evar.
Now we have this:

Good job! Now, the next step is optional...
STEP FOUR
...but I like it. Yet again, I upped the saturation +10.

Done! Told ya it was easy!