(no subject)
Right! Since everyone else is making tutorials, I've decided that I like being trendy! And by trendy, I mean a follower.
From this to
in 3,938 easy steps~
I'm using PSP9, but it should translate to almost anything, as should the condescending tone.
1; RIGHT. So you wake up and go, "Hey, today I'd like to icon an obscure artbook!" Or you don't! Either way, you get your image, which in this case is here. Save it and open it in your program or copy and paste it, I don't really care.
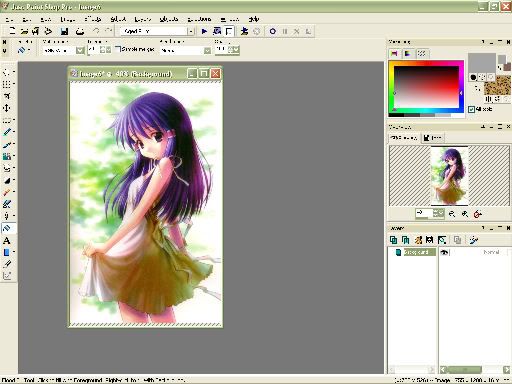
2; Now, here is JAZZY'S SPESHUL TEKNEEK LOLZ!1111111 Zoom out a bit, to whatever you want. In this case, it's about 25%. Now, hit Print Screen-- you know, the little button you use when stealing graphics from right-click-prohibited sites.
Go File -> New, and make a new 100x100 image. After that, go to Edit -> Paste -> Paste as New Layer, or CTRL+L for PSP dorks. Use your little movey-tool thing, the one that looks like a compass, until you get it placed the way you want. For me, that's like this:

Normally, I'd do some base clean-up here, but it's all pretty so we don't need to.
3 New Layer, lolz, and I flood-fill it with a dark-dark blue, specific hex code being #050e2d, and set it on Exclusion 100%. Why? Because I goddamn felt like it, that's why, brat. Shut up-- and close your mouth. Damn kids wouldn't know respect if it kicked them in the ass.
This is what it looks like so far:

Not too shabby, but faaaaaaaar from done.
4; Okay, PSP froze on me, wait one sec.
...
...
There. Now where was I. Step four, okay.
4; New Layer again, flood-fill it with #b5ba6a, set to Darken at around 68%.

5; New Layer, lololololol. Flood-fill with a light pinkish-red, #ffdfe4, set to 100% Soft Light, but now here's the change!! Instead of a neeew layer, you DUPLICATE THIS ONE. Yes, I know. Ingenious.

ISN'T THIS SO PRETTY YES I KNOW ♥
6; This is going to sound really weird, but if you followed step 2, crop the image to 100x100. DON'T ASK, JUST DO. You could have done that at any point but lol jazzy forgets things!11 Now either duplicate your base layer or copy then paste as new layer. Either way, drag it to the top and set it to Overlay 100%.

7; Duplicate that last layer and set it to Darken 60%. It should look AT LEAST A LITTLE DIFFERENT OKAY STFU WHAT DO YOU WANT FROM ME ;____;

8; Take this texture from someone gender. Set it to Burn 100%.
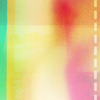
->
9; Now take this texture by colorfilter and set it at Screen 100%. YAAAAYYYY!1111
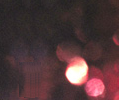
->
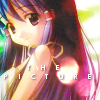
10; Text. The bane of my existence. So obviously, I use a text brush by forbiddenstorm. YAAAAY!!!1111 Go to Effects -> 3D Effects -> Drop Shadow, fiddle with the settings, and you get this.

->
11; Last step! YAAAYYYYY!111 I made some white tinytext-- Times New Roman at 1pt, nothing fancy-- and fooled around with the opacity.

AND THERE YOU GO.
Steps 3 to 6 inspired by this tutorial.
From this to

in 3,938 easy steps~
I'm using PSP9, but it should translate to almost anything, as should the condescending tone.
1; RIGHT. So you wake up and go, "Hey, today I'd like to icon an obscure artbook!" Or you don't! Either way, you get your image, which in this case is here. Save it and open it in your program or copy and paste it, I don't really care.

2; Now, here is JAZZY'S SPESHUL TEKNEEK LOLZ!1111111 Zoom out a bit, to whatever you want. In this case, it's about 25%. Now, hit Print Screen-- you know, the little button you use when stealing graphics from right-click-prohibited sites.
Go File -> New, and make a new 100x100 image. After that, go to Edit -> Paste -> Paste as New Layer, or CTRL+L for PSP dorks. Use your little movey-tool thing, the one that looks like a compass, until you get it placed the way you want. For me, that's like this:

Normally, I'd do some base clean-up here, but it's all pretty so we don't need to.
3 New Layer, lolz, and I flood-fill it with a dark-dark blue, specific hex code being #050e2d, and set it on Exclusion 100%. Why? Because I goddamn felt like it, that's why, brat. Shut up-- and close your mouth. Damn kids wouldn't know respect if it kicked them in the ass.
This is what it looks like so far:

Not too shabby, but faaaaaaaar from done.
4; Okay, PSP froze on me, wait one sec.
...
...
There. Now where was I. Step four, okay.
4; New Layer again, flood-fill it with #b5ba6a, set to Darken at around 68%.

5; New Layer, lololololol. Flood-fill with a light pinkish-red, #ffdfe4, set to 100% Soft Light, but now here's the change!! Instead of a neeew layer, you DUPLICATE THIS ONE. Yes, I know. Ingenious.

ISN'T THIS SO PRETTY YES I KNOW ♥
6; This is going to sound really weird, but if you followed step 2, crop the image to 100x100. DON'T ASK, JUST DO. You could have done that at any point but lol jazzy forgets things!11 Now either duplicate your base layer or copy then paste as new layer. Either way, drag it to the top and set it to Overlay 100%.

7; Duplicate that last layer and set it to Darken 60%. It should look AT LEAST A LITTLE DIFFERENT OKAY STFU WHAT DO YOU WANT FROM ME ;____;

8; Take this texture from someone gender. Set it to Burn 100%.

->

9; Now take this texture by colorfilter and set it at Screen 100%. YAAAAYYYY!1111

->

10; Text. The bane of my existence. So obviously, I use a text brush by forbiddenstorm. YAAAAY!!!1111 Go to Effects -> 3D Effects -> Drop Shadow, fiddle with the settings, and you get this.

->

11; Last step! YAAAYYYYY!111 I made some white tinytext-- Times New Roman at 1pt, nothing fancy-- and fooled around with the opacity.

AND THERE YOU GO.
Steps 3 to 6 inspired by this tutorial.